MAILBOX INSTALLATION
POST MOUNT MAILBOXES
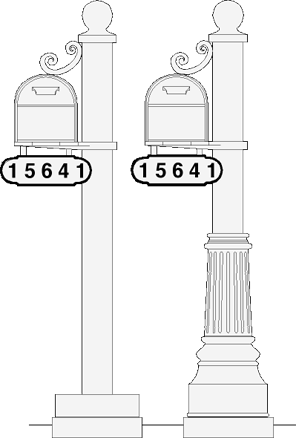
Streetscape Mailbox mounted on Streetscape Pole
Each post mount mailbox has four holes positioned to match all Streetscape mailbox poles.
The mounting holes are centered on the bottom of the box 5 1/2" front to back and 5 1/4" side to side.
Four 3/4" stainless machine screws with nuts and washers are provided with each mailbox.
1) Set mailbox in place aligning mailbox holes to holes in support plate.
2) Insert screws in large washers then insert screws through mailbox holes from the inside.
3) Secure split lock washers and nuts to screws from under the support plate.
4) Tighten using 5/32" Allen wrench inside mailbox, and pliers to hold nut.
NOTE:
The Oxford mailbox install is the same except the hole pattern is 8 1/2" front to back
and 7 1/4" side to side (Oxford is designed for use with the SI-223SX only).
Streetscape Mailbox mounted on wood Pole
A 4" X 4" wood post with 1 1/2" to 2" cross boards is the most common style.
The holes should align near the center of the cross boards.
Four 1 1/4" X 1/4" stainless hex head lag bolts with large washers are suggested.
(Mark and pre drill holes to avoid splitting wood)
WALL MOUNT MAILBOXES
Each wall mount mailbox has two holes positioned at the top corners of the back of the mailbox.
Two 1 1/4" stainless screws with 1" #10 plastic screw anchors and washers are provided with each mailbox.
1) Position mailbox in desired location and mark wall through the center of mounting holes.
2) Drill both holes in wall 1" deep using 1/4" drill bit.
3) Insert plastic screw anchors into holes.
4) Insert screws into washers.
4) Align mailbox to anchors in wall, insert screws and tighten.
RECESSED MAILBOXES
Each recessed mailbox installation presents a unique installation application.
It is sugessted that the person or contractor in charge of designing the recessed cavity call Streetscape
if they would like assistance. Below are some general guidlines.
1) Contractor should have the mailbox before building the cavity.
2) Mailbox should be slid into cavity and secured - IT SHOULD BE REMOVABLE.
3) The outer frame of the mailbox should be recessed as well to shelter from water/rain.
4" Mailbox Pole Installation
 METHOD 1 - Using prefabricated installation base (not included). METHOD 1 - Using prefabricated installation base (not included).
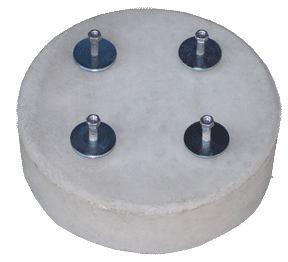
NSTALLATION BASE
Dimensions: 3”H X 12”W with 4 anchor bolts
Model Number: SI-014
 
STEP #1
Mark pole center location 20” behind curb face. Mailbox door will be 9 1/2 to 11” behind curb face.
(Confirm distance with postal carrier)
STEP #2
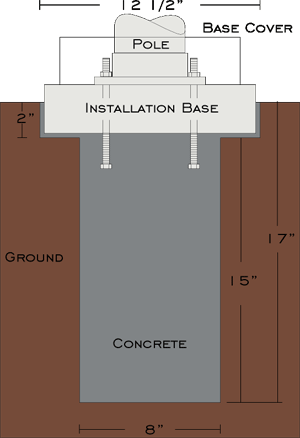
Dig hole using installation base as imprint on ground (see drawing).
STEP #3
Insert installation base in hole. Confirm base is level and 1” above surface. Remove installation base.
STEP #4
Mix concrete and fill hole to 1 1/2" from top. (Caution: quick setting concrete may set too fast).
STEP #5
Insert installation base in hole. Level base and adjust anchor bolts to parallel with curb. Allow concrete to set.
STEP #6
Mount mailbox pole to base. Use back access door for large base. (Mailbox on left).
STEP #7
Mount custom address sign and base cover (if applicable), then mount mailbox
METHOD 2 - Using all poured concrete.
Comming soon.
4" Craftsman Pole Installation
METHOD 1 - Using prefabricated installation base (not included).
Comming soon.
METHOD 2 - Using all poured concrete.
 Materials needed: Materials needed:
- Shovel
- Wood saw
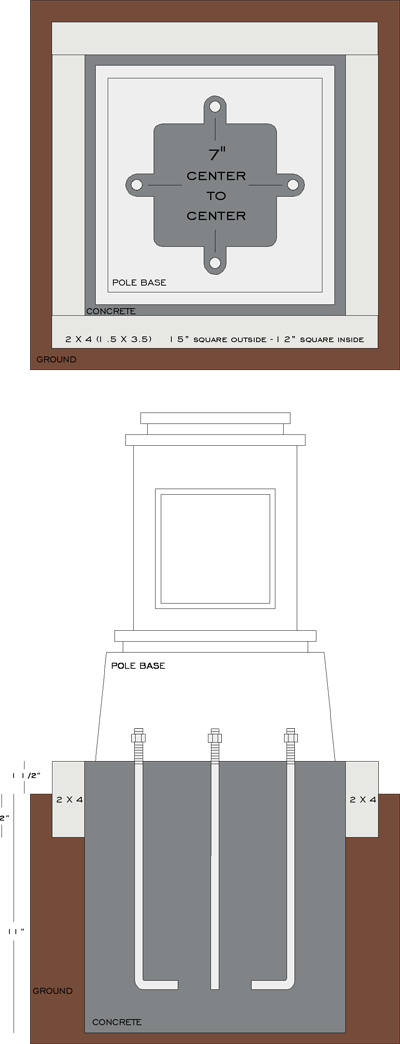
- 2 X 4 - 4 1/2’ (Note: standard 2 X 4 is 1 1/2” X 3 1/2”)
- 1/4” plywood - 15” square
- 3/8 Drill bit and Drill
- Concrete mix
- Sand
- Wheel Barrel or Large bucket
- Phillips head screwdriver
- Rachet set
- Allen wrench set
Mailbox location
- Center Concrete pad and Pole 9” behind back of curb
Dig Hole
- 12”X12” (11to 12” Depth)
- Expand the top 2” of hole to 15 X15”
Wood Form
- Cut 2 X 4 into 4 pieces ( 2-12” and 2-15”)
- Connect using wood screws (long pieces front and back)
- Insert form into expanded portion of hole
Wood Template
- Cut 1/4” plywood 15” square
- Center paper template on plywood
- Mark center point of anchor bolts (4) on plywood
- Drill holes at center points using 3/8” bit
Template Assembly
- Insert anchor bolts into holes
- Secure with two nuts each, above and below plywood
- Adjust to provide 1” of thread above plywood
- Angle “L” portion of anchor bolts inward
- Set assembled template / anchor bolts onto hole centered
- with edges flush with 2 X 4 form.
- Confirm all details listed above are followed
Mix Concrete
- Remove template / Anchor bolts
- Mix concrete according to manufacturers instructions
- Mix enough concrete for one cubic foot
- Use standard concrete to ensure that dry time allows for anchor bolts to be inserted after pouring
- Use sand not aggregate to provide a smooth finish
Pour Concrete
- Pour concrete to within 1/2” of top of 2 X 4
- Use concrete edger if desired to give edges a radius
- Slide template / anchor bolts into hole / concrete
- Allow concrete to set one day (see package instructions)
Set Post
- Remove top nuts from template
- Slide template off of set anchor bolts
- Remove bottom nuts from anchor bolts
- Remove 2 X 4 form
- Remove back access door from mailbox pole (2 screws)
- Set pole on to concrete pad aligning bottom with anchor bolts
- Adjust pole to parallel with street
- Secure pole with washers and nuts through access door
- Attach access door
Assemble Post
- Attach address sign (if applicable) using attached screws
- Set mailbox on suport plate aligning hole in box with plate
- Insert supplied mailbox bolts into large fender washers
- Insert bolts from inside of box through bottom and support plate
- Slide lock washers and nuts onto bolts and tighten
|


